One of the big selling points for id Software’s ΜΟΊΡΑ is the new SnapMap tool. It allows players to build maps, share maps and design all new campaigns with an easy-to-use toolkit that literally lets players snap together areas to create brand new maps. The basics of SnapMap aren’t hard to learn, but for players having a little bit of difficulty learning how to build a map in ΜΟΊΡΑ there’s a useful walkthrough guide available to help players along the way.
You can check out the 25 minute video guide below from YouTuber Σέρις Τάκλυς that walks you through the basics of building a ΜΟΊΡΑ map in SnapMap for the Xbox One, PS4 or PC.
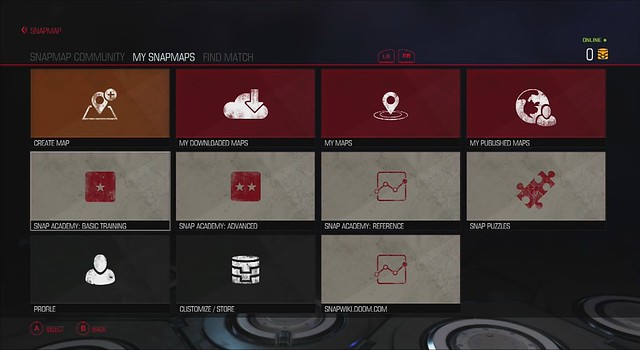
From the main menu you can create a map, download a map, view your own created maps, view the maps that you have published, view a basic training guide for making maps, check the store, visit the wiki or look over your profile.
For creating a map, you simply click “Create Map”. In doing so, you have the option of selecting from a range of basic templates, including a basic template, a classic deathmatch template, capture the flag, survival, extraction, king of the hill, a tiny template and team deathmatch.
On the home consoles, you can tap the up button on the digital pad to enter object mode and begin placing items.
There are two major rooms that you will need in order to make a viable level, including a spawn room and an exit room.
You can move and rearrange the spawn or exit rooms wherever you like.
If you decide to make a multi-room tile to your map but you only want to make use of one or two of the doors, the other unused pathways will automatically be blocked off.
To modify pathways and doorways, enter into object mode by pressing the up button on the D-pad and then moving over to the doorway that you want to edit. On the PlayStation 4’s DualShock 4 controller, tap the Triangle button, or on the Xbox One controller tap the Y button to pull up the menu in order to edit the door properties and how it behaves.
From here you you can choose a number of different properties, from locking the door, having it require a keycard to open, even being able to choose the color of the door or a custom message that plays for locked doors.
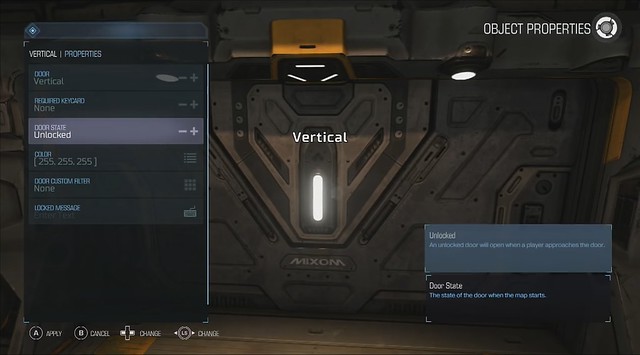
You can have the door open vertically, horizontally or in a special method like the four-way open and close state. If you want the door to start closed, then simply switch the door state to “Locked”.
In order to open the door you’ll need to connect an active object to it that allows the players to “unlock” the door. So for starters, while in object mode tap the button to add an object. Scroll over to “Interactives” from within the object menu. Select the control panel from the menu and place it down where you want it to activate the door.
After placing the panel down, tap ‘A’ (or ‘X’ if you’re using a DualShock 4) to bring up the code wheel. In the video it’s mentioned that it’s very similar to Project Spark’s code wheel. So if you’re familiar with Skybox Labs’ title, you should feel right at home with ΜΟΊΡΑ'μικρό SnapMap.
At the bottom of the wheel you’ll see an icon that says “On Used”; this indicates that when players interact with the panel, something will happen when it’s used.
SnapMap is a very intuitive system, so when you select for the panel to perform an action, you simply direct it to the object you want it to interact with (which is the door, in this case) and press ‘A’ (or ‘X’ on PS4) on the door to have it perform an action, which can be anything from having the door lock to having the door open.
The video also shows that you can alter each of the modules so they have a specific look. Pressing ‘Y’ or Triangle on the room will pull up a menu that will allow you to change the atmosphere, the lighting or decals like floor clutter, ceiling clutter or fog.
You can also place down objects within modules to create certain room effects, such as a computer room, a lab, a factory or a storage housing for weapons.
Placing down enemies is pretty simple, but the video shows you how to place down enemies that are activated by performing a specific action. In this case, we see that a Possessed Scientist is placed down from the object menu. You can further edit each monster placed in the map by pressing ‘Y’ or Triangle.
In this particular case if you want monsters to spawn after activating a switch, picking up a weapon or going through a door, be sure to go into their properties and uncheck the tab “Show On Start”. This will prevent them from showing up in the map once it loads. What you do next is head back to the object that you want to interact with the monster – in the case of the video it’s the chaingun – and have it setup where on pick-up the chaingun connects to the Possessed Scientist and that it “Shows” the Scientist once the player has retrieved the chaingun.
If you want to make a trap scenario where multiple monsters appear after activating an object, you can simply duplicate the monster(s) using the Left Trigger, and then select the “Show” tile and press ‘A’ to link it to the other hidden monsters, so that when the chaingun is picked up all of the them appear behind the player.
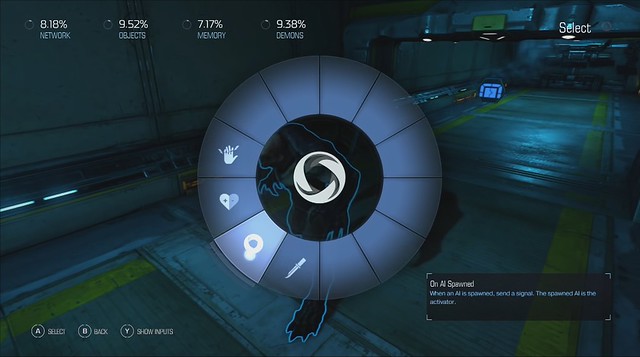
You can also alter the spawn behavior of certain AI, so if you want them to ambush the player after spawning you can have them move to the player’s location like an ambush only after they see the player. There’s the default attack behavior, and then there’s the special hunt behavior that enables the AI to πάντοτε know exactly where the player is and hunt them down at all costs.
You can also have the AI react to certain events. If you select them you can have them react to the spawning of another monster, or a certain event can take place after they’re killed – such as opening a door, revealing a secret or triggering another ambush – or you can certain things take place when their health reaches a certain percentage.
In the video they showcase that the door won’t open unless players kill the Hell Knight first. The death of the Hell Knight is attached to opening the locked door.
Inversely, it’s also possible to have a player kill an AI that causes the door to lock, forcing them to have to go back from whence they came in order to kill another monster or find a key to proceed. You would simply have the door lock when the Hell Knight is killed and possibly have another door open that contains a control panel that opens the locked door. That’s a more advanced SnapMap technique, though.
Later in the video an example is showcased how to build traps for ambushes.
To build a trap you’ll need to select a Box Trigger from the Volumes object menu.
After placing down the Box Trigger (or any other volume object) simply click on it and in the properties change the Size tab to make it bigger, smaller or wider to fit the kind trap or ambush area that you want.
If you don’t want to give the player a hint that the Box Trigger exists, you’ll want to uncheck the Show At Start flag from the properties menu.
To attach the Box Trigger to an actual ambush, you’ll need to put down a spawner. Anyone who has played around with Mod Garry του should be right at home with this feature.
In the object menu go over to the Spawners tab and select the kind of spawn element that you want. In the case of the video he uses a Wave Event, so that multiple enemies will spawn in waves against the player(s).
You can setup the Box Trigger to activate an event based on whether players enter into the specified area or whether or not they’re exiting the area or whether or not another event triggers the box. If it’s setup where everyone has to exit the field before an event is triggered. After selecting how you want the ambush to be triggered, you can attach the logic to the spawner. From there, highlight the spawner to change the properties.
For Wave Event spawners it’s possible to have it automatically lockdown a module or area, so that players are locked inside.
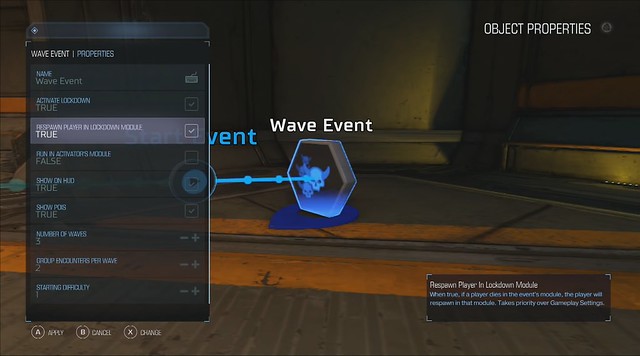
You can choose how many waves you want, how many enemies per waves are there and how difficult each wave will get.
It’s a great way to conserve on memory as well since you don’t have to worry about micromanaging individual AI or specifically selected groups of AI. Once again, it’s like Mod Garry του when it comes to AI spawn management.
Point of Interests are used as to help indicate where players need to go, so for specific checkpoints or whatnot, PoI nodes are great for nav point indicators.
For a stage exit, you can either have the door open, or locked or attached to an event. In the video the stage exit is attached to the Wave Event, so that if players complete the event the door to the exit opens up.
Despite some of the limitations with the player count and the weapon usage – not to mention the RPG-style hit counter – SnapMap does offer a rather strong opportunity to build some creative maps for ΜΟΊΡΑ. It’s pretty much equivalent to the map creation tool from TimeSplitters.
ΜΟΊΡΑ is available right now. A lot of gamers are loving the single-player campaign, and according to the reviews the multiplayer isn’t that hot but some gamers are warming up to SnapMap. You can grab the game for PC, Xbox One or PS4.